
Now Reading: Upgrading Proxmox VE from 8 to 9
-
01
Upgrading Proxmox VE from 8 to 9

Introduction
Proxmox Virtual Environment (PVE) is one of the most popular open-source virtualization platforms. Each new major release comes with improved security, performance, and new features.
Proxmox VE 9 is based on Debian 13 (“Trixie”). To safely and reliably upgrade your existing 8.x installation to 9.x, proper sequencing and careful planning are essential.
This guide presents the most up-to-date, detailed, and accurate steps to securely upgrade both Proxmox VE and all Debian components.
1. Pre-Upgrade Preparations
1.1. Critical Warnings
- The upgrade process is irreversible.
- There is a risk of data loss on all virtual machines, containers, and the Proxmox server itself.
- Physical access (KVM, IPMI, iDRAC, etc.) is recommended. If you lose remote access (SSH, web interface) during the upgrade, recovery will be more difficult.
- Check all your backups and snapshots, and make sure they actually work!
1.2. Backups
a) VM and Container Backups
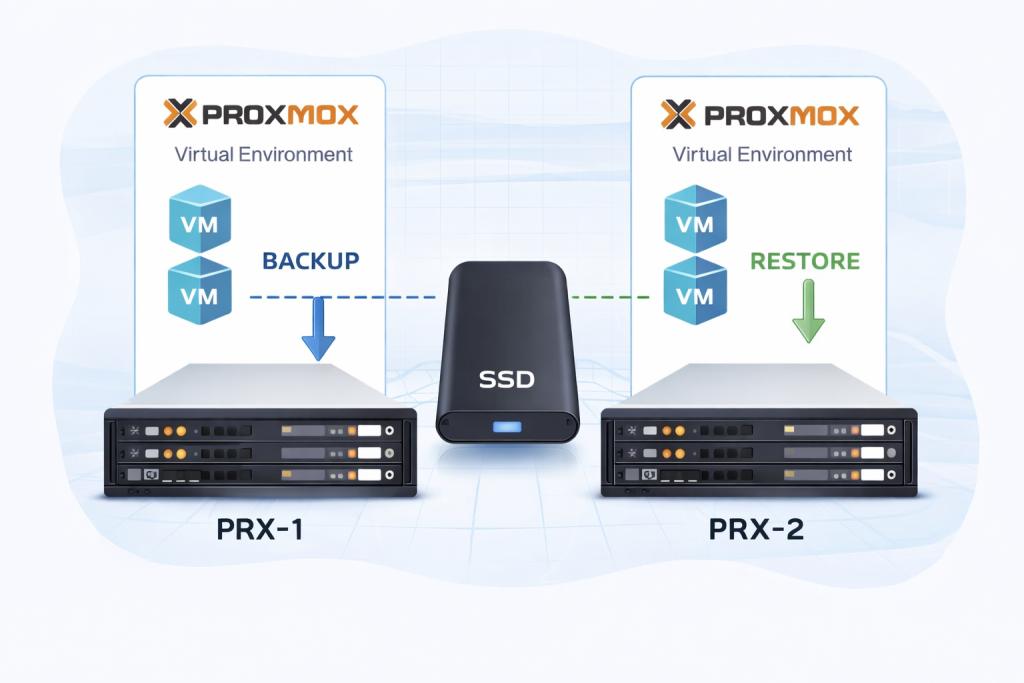
- Take full backups of all VMs and CTs.
In the Proxmox interface: Datacenter > Backup > Backup now
CLI:vzdump <VMID> --dumpdir <backup directory> --mode snapshot
b) Configuration Backups
- Copy the /etc/pve and /etc folders to an external location:
tar czvf /root/pve-config-backup.tar.gz /etc/pve /etc
c) For Proxmox Backup Server Users
- Is your backup storage connected and working? If there are problematic or unreachable storages under “Datacenter > Storage,” errors may occur during the upgrade.
- Transfer a copy of your backups to an additional external server.
1.3. Scheduling the Upgrade
- If possible, schedule the upgrade outside business hours or during periods of low system usage.
- It is recommended to shut down all VMs and containers before the upgrade.
1.4. Check Your Packages and Features
- If you use Ceph, ZFS, custom kernel modules, third-party software, custom network bridges, or firewall rules, research their compatibility with Debian 13 and Proxmox 9.
- If you have custom hooks, scripts, or plugins, make sure they are compatible with Debian 13 and Proxmox 9.
2. Update Your Current System
One of the most important steps is to leave no pending updates on your current system before starting the upgrade. This prevents incompatibilities and conflicts.
apt update apt full-upgrade After the commands complete, reboot your server:
reboot This step ensures the new kernel and all updated packages are loaded.
3. Run the “pve8to9” Compatibility Checker
Proxmox provides an automatic compatibility checker specifically for upgrading from 8 to 9.
pve8to9 The output will show:
- PASS: No issues found.
- WARN: Warnings you should pay attention to (e.g., running VM, disconnected storage, missing network bridge, custom kernel, old repo).
- FAIL: Critical problem that will stop the upgrade.
Common Warnings and Their Meanings
| Warning | Meaning & Solution |
|---|---|
| Running VM/CT detected | It’s recommended to shut down before upgrading |
| Storage not connected / not active | Disable if not used, or mount if needed |
| No network bridge | Remove unused VM bridge references |
| Old or custom repo detected | Update or disable before upgrading |
Do not proceed with the upgrade until all WARN/FAIL outputs are resolved!
4. Update All Debian Sources from “bookworm” to “trixie”
Proxmox VE 9 is based on Debian 13 (“Trixie”). All your package sources (“repositories”) should reference “trixie” instead of “bookworm”.
4.1. Bulk Replace All Source Files
sed -i 's/bookworm/trixie/g' /etc/apt/sources.list sed -i 's/bookworm/trixie/g' /etc/apt/sources.list.d/*.list If you are using Ceph, non-free, enterprise, or custom repositories, check each of them separately!
4.2. Manual Inspection
- Make sure there are no lines with bookworm left in
/etc/apt/sources.listand all.listfiles under/etc/apt/sources.list.d/. Only trixie should be present. - If you still see any bookworm lines, comment them out with
#.
4.3. Correct Repository Format
Sample repositories for Proxmox VE 9 and Debian 13:
# Proxmox VE 9 (no subscription) deb http://download.proxmox.com/debian/pve trixie pve-no-subscription # Debian 13 Trixie Main & Contrib deb http://deb.debian.org/debian trixie main contrib # Debian 13 Trixie Security deb http://security.debian.org/debian-security trixie-security main contrib # Debian 13 Trixie Updates deb http://deb.debian.org/debian trixie-updates main contrib If you use the enterprise repository or any third-party repos, make sure to add the appropriate Trixie-compatible versions.
5. Start the Upgrade Process
5.1. Refresh Package Lists
apt update If you see ERROR or 404 Not Found messages, review your repository addresses.
5.2. Start the Distribution Upgrade
apt dist-upgrade - During the upgrade, you may be prompted about old or changed configuration files with questions like “Do you want to use the new version or keep your own?” It is generally recommended to use the Proxmox defaults, but make sure you have backups of your custom configs.
- This process can take 10–40 minutes, depending on your disk and CPU.
5.3. Custom Kernel Modules and Additional Packages
- If you use kernel modules compiled via DKMS (e.g., ZFS, NVIDIA, Mellanox, etc.), you may need to recompile them after upgrading.
- Make sure all your additional support packages are compatible with Trixie.
6. Reboot the System
Once the upgrade and dist-upgrade are finished:
reboot When the server starts up, the new kernel and updated packages will be loaded.
7. Post-Upgrade Checks
7.1. Access the Proxmox Web Interface
- Log in to the web interface using your server’s IP or hostname on port 8006 (https://server-ip:8006).
- In the bottom left, check that the version displays as “Proxmox VE 9.x”.
7.2. System Health Check
- Syslog/Journald: Are there any error messages or important warnings?
journalctl -p 3 -xb - Services: Are all main services active?
systemctl status pvedaemon pveproxy pvestatd
7.3. VM and Container Testing
- Start each VM and container individually to ensure they work as expected.
- Test for network and disk access issues, and verify there are no errors in backup jobs.
7.4. Storage and Backup
- Confirm that all storages are shown as “active” and accessible under Datacenter > Storage.
- Test backup (backup/restore) operations.
7.5. Network Bridges and Firewall
- If you use custom bridges, VLANs, OVS, or firewall configurations, retest them after the upgrade.
- Missing bridges or outdated references (e.g., if
vmbr2is missing but a VM is assigned to it) can cause errors.